# Assuming the step one virtual environemnt is set up and actiavted and ready in the terminal, run the following commands to install the classifai package and the huggingface dependencies.
## PIP
#!pip install "https://github.com/datasciencecampus/classifai/releases/download/v0.2.1/classifai-0.2.1-py3-none-any.whl"
#!pip install "classifai[huggingface]"

## UV
#!uv pip install "https://github.com/datasciencecampus/classifai/releases/download/v0.2.1/classifai-0.2.1-py3-none-any.whl"
#!uv pip install "classifai[huggingface]"✨ ClassifAI Demo ✨
ClassifAI is a tool to help in the creation and serving of searchable vector databases, for text classification tasks.
There are three main concerns involved in making a live, searchable, vector database for your applications:
- Vectorising - The creation of vectors from text
- Indexing - The creation of a vector store, converting many texts to vectors
- Serving - Wrapping the Vector Store in an API to make it searchable from endpoints
ClassifAI provides three key modules to address these, letting you build Rest-API search systems from your text data
Installation (pre-release)
Classifai is currently in pre-release and is not yet published on PyPI.
This section describes how to install the packaged wheel from the project’s public GitHub Releases so that you can follow through this DEMO and try the code yourself.
1) Create and activate a virtual environment in command line
Using pip + venv
Create a virtual environment:
python -m venv .venvUsing UV
Create a virtual environment:
uv venvActivate the created environment with
(macOS / Linux):
source .venv/bin/activateActivate it (Windows):
source .venv/Scripts/activate2) Install the pre-release wheel
Using pip
pip install "https://github.com/datasciencecampus/classifai/releases/download/v0.2.1/classifai-0.2.1-py3-none-any.whl"Using uv
uv pip install "https://github.com/datasciencecampus/classifai/releases/download/v0.2.1/classifai-0.2.1-py3-none-any.whl"3) Install optional dependencies ([huggingface])
Finally, for this demo we will be using the Huggingface Library to download embedding models - we therefore need an optional dependency of the Classifai Pacakge:
Using pip
pip install "classifai[huggingface]"Using uv pip
uv pip install "classifai[huggingface]"Note! :
You may need to install the ipykernel python package to run Notebook cells with your Python environment
#!pip install ipykernel

#!uv pip install ipykernel
If you can run the following cell in this notebook, you should be good to go!
from classifai.vectorisers import HuggingFaceVectoriser

print("done!")
Demo Data
This demo uses a mock dataset that is freely available on the ClassifAI repo, if yo have not downloaded the entire DEMO folder to run this notebook, the minimum data you require is the DEMO/data/testdata.csv file, which you should place in your working directory in a DEMO folder - (or you can just change the filepath later in this demo notebook)
Vectorising

We provide several vectoriser classes that you can use to convert text to embeddings/vectors;
from classifai.vectorisers import (
    HuggingFaceVectoriser,
    GcpVectoriser,
    OllamaVectoriser
)
If none of these match your needs, you can define a custom vectoriser by extending our base class;
from classifai.vectorisers import VectoriserBaseThere is another DEMO notebook, called custom_vectoriser.ipynb which provides a walk through of extending the base class to make a custom TF-IDF Vectoriser model.
Initialising a vectoriser:
We’ll download and use a locally-hosted, small HuggingFace model;
# Our embedding model is pulled down from HuggingFace, or used straight away if previously downloaded
# This also works with many different huggingface models!
vectoriser = HuggingFaceVectoriser(model_name="sentence-transformers/all-MiniLM-L6-v2")

# The `.transform()` method converts text to a vector, or several texts to an array of vectors
my_first_vector = vectoriser.transform("classifai is a great tool for building AI applications.")
list_of_vectors = vectoriser.transform(["bag-of-words isn't as good as classifAI", "tf-idf isn't as good as classifAI"])


my_first_vector.shape, list_of_vectors.shape
The Vectoriser API is simple; it takes in a string or a list and strings, and returns a Numpy ndArray object.
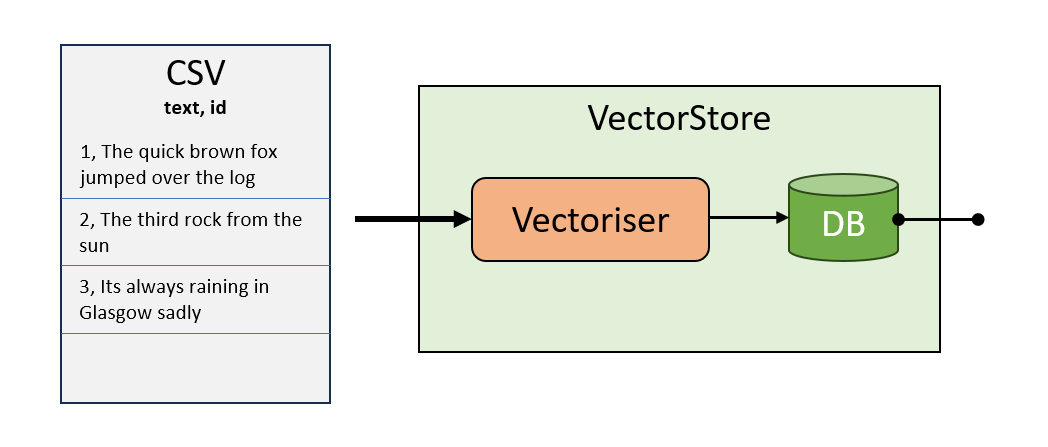
Indexing
The VectorStore class creates a vector database by converting a set of labelled texts to embeddings, using an associated Vectoriser.
Once created, it can be ‘searched’, using the vectoriser to embed queries as vectors and calculate their semantic similarity to the labelled texts in the VectorStore
from classifai.indexers import VectorStore

my_vector_store = VectorStore(
    file_name="data/testdata.csv",
    data_type="csv",
    vectoriser=vectoriser,
    meta_data={"colour": str, "language": str},
    overwrite=True,
)
VectorStore Data Objects
We’ve created a VectorStore with the code above. As we’ll see in the next few code cells, we can ‘search’ the vector store by passing a ‘query’ to it to get top K results that are similar to the query.
But how do we pass the queries to the VectorStore?
ClassifAI provides specialised Pandas datframe objects for each kind of request that can be made to the VectorStore - this provides a clear and consistent interface for sending data to the VectorStore (and also receiving data from the vectorstore).
First lets look at the VectorStoreSearchInput data object:
from classifai.indexers.dataclasses import VectorStoreSearchInput

input_data = VectorStoreSearchInput(
    {"id": [1, 2], "query": ["What is the colour of the sky?", "What language is spoken in Brazil?"]}
)

input_data
In the above cell, we’re building the object that the VectorStore takes in to do the search process. Our input expects two columns of data, id and query, as above. And this data can be passed to our VectorStoreSearchInput class, as a dictionary or alreadt as a Pandas dataframe.
If you try to remove some of the data, say the ‘id’ column. Our data class object will inform you that you’re missing some data. In this sense the data classes keep you right when working with the Package.
Look at the type of the input_data object we created, notice that it is not of type Pandas, but our own custom type. Under the hood this is doing the additional work to validate the data your passing in.
Once created, you can search the vector store by calling the .search() method
Actually calling the VectorStore is very simple once we have that data object
my_vector_store.search(input_data)# you could pass your query(s) inline with the object as well: (AND specify how many results you want per query)
my_vector_store.search(VectorStoreSearchInput({"id": [999], "query": "is the desert large?"}), n_results=5)You can also search by id by calling the .reverse_search method on the object
We call a different method for this on the vectorstore reverse_search() - and it has its own data class object - VectorStoreReverseSearchInput
from classifai.indexers.dataclasses import VectorStoreReverseSearchInput

input_data_2 = VectorStoreReverseSearchInput({"id": ["1", "2"], "doc_id": ["1100", "1056"]})

my_vector_store.reverse_search(input_data_2)
With reverse search you can do partial matching!
use the partial match flag to check if the ids/labels start with our query id
input_data_3 = VectorStoreReverseSearchInput({"id": ["1", "2"], "doc_id": ["1100", "105"]})

my_vector_store.reverse_search(input_data_3, partial_match=True)
## use n_results to limit the amount of results per-item
my_vector_store.reverse_search(input_data_3, n_results=2, partial_match=True)VectorStore Embed method
Its also possible to get the vector embeddings for each from some input text or queries by calling the VectorStore .embed() method.
Once again, this method has its own data class to inferace with: VectorStoreEmbedInput
from classifai.indexers.dataclasses import VectorStoreEmbedInput

input_data_3 = VectorStoreEmbedInput(
    {
        "id": ["a", "b"],
        "text": [
            "The quick brown fox jumps over the lazy dog.",
            "Classifai is an amazing library for AI applications.",
        ],
    }
)

my_vector_store.embed(input_data_3)
The Output Dataclass Objects!
We’ve seen an input data classes for each of our VectorStore’s methods: embed, search, and reverse Search…
but these VectorStore methods also have output dataclass objects too, which provide a consistent output interface for you to work with.
In all cases, for output and input data class objects, the column names are specific:
## The VectorStoreEmbedOutput object:

embed_output = my_vector_store.embed(input_data_3)
print(type(embed_output))
embed_output
## The VectorStoreReverseSearchOutput object:
reverse_search_output = my_vector_store.reverse_search(input_data_2)
print(type(reverse_search_output))
reverse_search_output## The VectorStoreSearchOutput object:
search_output = my_vector_store.search(input_data)
print(type(search_output))
search_outputInstantiating Data Class Objects
The dataclass objects are central to passing and receiving data from the VectorStore. You can therefore instantiate them with the traditional init method, or directly with the method .from_data which achieves the same affect.
However in future updates we intend to add more methods, for example ‘from_csv’ which we anticipate would allow users process large files of queries more easily.
input_data_4 = VectorStoreSearchInput({"id": [3], "query": ["What is the colour of grass?"]})

### IS THE SAME AS:

input_data_5 = VectorStoreSearchInput.from_data({"id": [3], "query": ["What is the colour of grass?"]})
Serving up your VectorStore!
So you’ve created a VectorStore, with your chosen Vectoriser; that makes vectors and you can search it…
Now, how do I host it so others can use it?
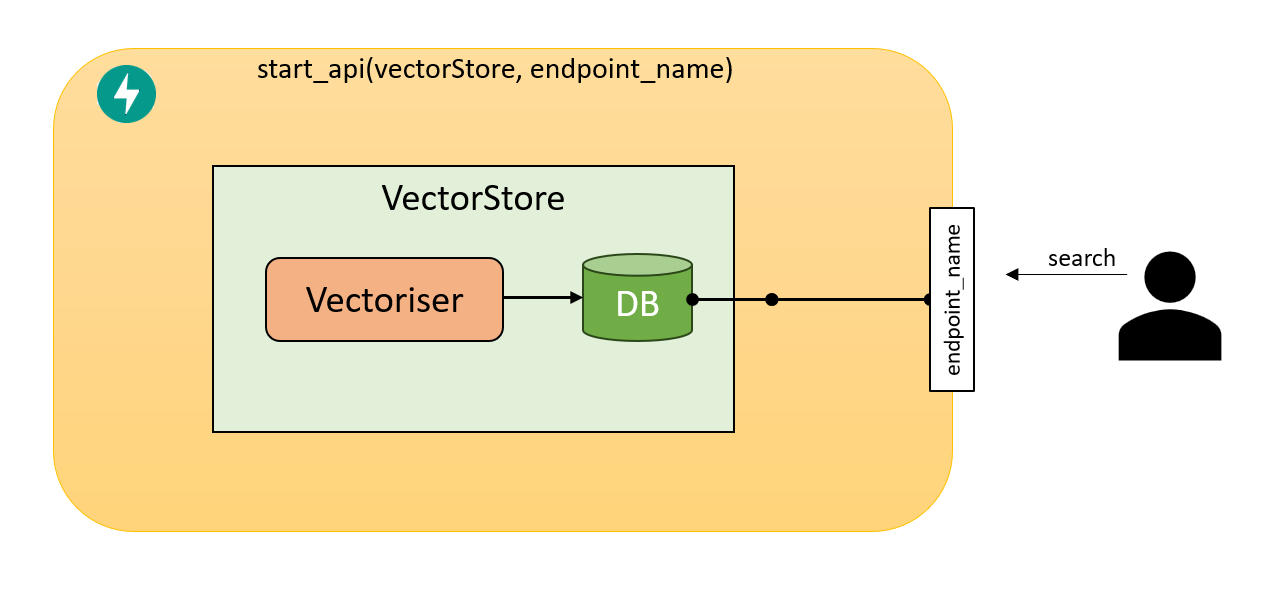
To Serve an api all we need to do is create a Vectorizer, and a Vector store, then pass it into out server start_api function for it to begin serving fast api endpoints for out VectorStore.
We have a demo script at ./DEMO/general_workflow_serve.py
Here’s a an example of what it does
##### first we load the vectoriser used in the vectorstore creation
from classifai.indexers import VectorStore
from classifai.servers import start_api
from classifai.vectorisers import HuggingFaceVectoriser

# Our embedding model is pulled down from HuggingFace, or used straight away if previously downloaded
# This also works with many different huggingface models!
vectoriser = HuggingFaceVectoriser(model_name="sentence-transformers/all-MiniLM-L6-v2")


#### now we can load the vectorstore back in without having to create it again
loaded_vectorstore = VectorStore.from_filespace("./DEMO/testdata", vectoriser)


#### look wow! you can search it straight away cause it was loaded back in

print(f"Test search {loaded_vectorstore.search('did the quick brown fox jump over the log?')}")


#### and finally, its easy to search your vectorstore via a restAPI service, just run:
start_api([loaded_vectorstore], endpoint_names=["my_vectorstore"])

# Look at https://0.0.0.0:8000/docs to see the Swagger API documentation and test in the browser